Greetings all,
I apologize for the late follow up from our meeting last weekend.
Before I forget, IPMS Nationals in Phoenix will take place during the next meeting. While several of us are going to be at Nationals we will still have our normal meeting. I will send out an agenda prior to the meeting as usual. If anyone has anything they would like to cover during the meeting, send me the information and I'll include it in the agenda.
Back to the meeting minutes...
We started off with an update of the container ship project. It's too much to be ready for Nationals and this isn't something to be rushed.
I have three different decal sets from three manufacturers. The first are the Revell kit decals. They only include one steamship company (Hapag Lloyd) which is a nice advertisement but not based in reality. Container ship companies have alliances just like the airlines. So you will see several different steamship company logos on containers plus companies that lease containers only.
An issue I ran into with this project is that the decals didn't want to settle down on the casting. The casting contains very fine corrugation just like on the real thing. However the decals are stubborn enough that they wouldn't settle easily resulting in unacceptable silvering.
I tried a variety of setting solutions. But first I started with a clear gloss base using Future acrylic floor care. Normally this works very well. It does dry thin though. I tried brush painting the Future on with two coats. Still the same silvering issue.
I started with Micro Set and Micro Sol which is a vinegar based system. I did not get great results. I tried Walthers Solvaset which is a chemical based product. I did not see noticeable effects.
Ultimately I made passes over the decal with a very sharp hobby knife blade and 10 plus coats of Micro Sol to get the Revell decals to lay down.
Now for the "nuclear" approach. Tamiya Extra Thin Cement. This is kind of the last ditch effort. I put down a small amount of this cement over the Gwylan and Big Blue Boy decals and that did the trick. The carrier film was dissolved into the finish. The paint and clear coat were not disturbed, at least from what I could tell. When I tried this on the Revell decal it bled terribly. Here's the before and after decal treated with Extra Thin.
The Revell decal. So test before you try. No worries with this container, it will get buried into a stack never to be seen again.
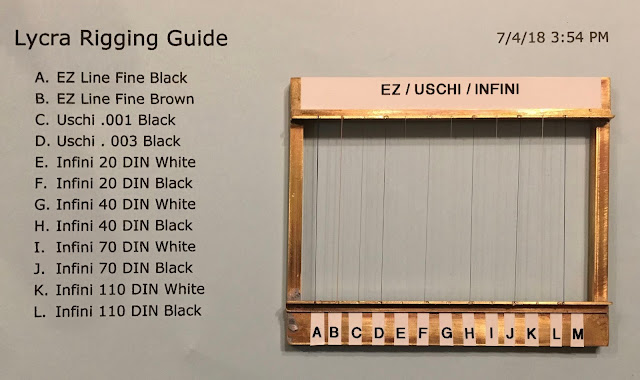
Next I created a demo of a variety of lycra rigging material. It's hard to know which one to use so I prepared this guide. With this I can hold it up next to my model and select the appropriate size. I really like the method for securing lycra rigging thread by placing the CA where I want the line to go and soaking the end of the thread in accelerator. Hint.... hold the line in place for a good 6 to 8 seconds before releasing. This way you don't have to worry about any trimming later. Up side of lycra rigging is that it's very forgiving if you bump into it. Very easy to work with. Down side is that if you look real close you can see that it has a slight appearance of being a little flat or twisting. If you ever want me to bring this to another meeting let me know.
Now on to the rest of the containers! Not really, this is the second bath ready to be painted. Only the containers on the exterior sides of the stacks will get decals. About 250 in all of the roughly 1500 containers that will go onto the ship.
Next Victor treated us to his latest creation. The famous Japanese Battleship Mikasa, Victor style! Victor explained that he had some trouble with the stacks so when he was frustrated with it he decided to paint them orange. They look great! Now we know what to look for if Victor has trouble with a kit. It will be painted orange! Wonderful build Victor!
John treated us to his latest completion which he shared in its beginning steps at the last meeting. This is the Konig Prince Albert in 1/700 scale.
John also treated us to some new kits. A very interesting subject is the HMS Hornet from Combrig in 1/700 scale.
Both the Prince Albert and the Hornet are available from Freetime Hobbies
I think this one could work into a great 1/700 diorama. It may be 1/720 scale but I don't think anyone would see a difference. Unfortunately the other pictures of the kits John brought in vanished somewhere in the process. John if you could bring them back I'll photograph them again!
Sam treated us to his latest effort for Blue Ridge Models which is the USS Oregon BB3. This is the hull for the . A great tip that Sam shared with us was to use Archer resin louver decals as grab handle type ladder rungs. Great idea Sam and great work on the hull! Sam's Massachusetts resulted in a great kit and Sam likes this one better. I can't wait to see the release on this one!
Hugh treated us with his scratch build project which is the as built USS New Mexico. Keep working at it Hugh!
That's it for this meeting.


